Pages

Tuesday, 26 March 2013

Congo Bars

Ok, I know almost the entire earth population have already baked and tried these bars...But as they said, better late than never, right? I first saw this recipe two years ago from the reigning "queen of layer cakes" Kak Rima's Bisous a Toi. From then on, a few other bloggers also tried this fabulous recipe and I finally settled on Kak Nor of Secubit Garam version. The original recipe calls for a pound of sugar (gasp!) and I decided to go with Kak Nor's reduced sugar measurement since we seem to share the same level of sweetness tolerance. What is best about these bars is that they are generously studded with chocolate chunks! Nothing can compare when you bite into that chocolate-y goodness amidst the dense, fudgy and mellow brown sugar cake. Heaven.    
look at 'em chocolate chunks!
Congo Bars
Source:Bisous a Toi & Secubit Garam 

Ingredients:
2 3/4 cup all purpose flour (315g)
2 1/2 teaspoons baking powder
1/2 teaspoon salt
2/3 cup butter, softened (150g)
1 lb. light brown sugar (453g) *I used 220 gm like Kak Nor
3 large eggs
1 teaspoon vanilla
11.5 ounce package milk chocolate chips (326g) *I used dark chocolate chunks
1 cup chopped pecans (optional) *I omit

Method:
1. Sift flour, baking powder and salt into a large bowl. Set aside.
2. Stir brown sugar into softened (not melted) butter in another large bowl until butter disappears. You can use the back of your spoon to help incorporate the two together.
3. Add eggs one at a time to butter mixture and stir well after each egg.
4. Add vanilla, chocolate chips and nuts. Mix well.
5. Add dry flour mixture and stir until well combined.
6. Coat a 13 X 9 pan with non-stick spray and spread batter evenly into dish. *I used 10X10 baking pan lined with baking paper
7. Bake at 170C for 30 minutes or until top is golden brown. Make sure you don’t over bake. *I baked at 160C for 30 mins.
Congo Bars
Sumber:Bisous a Toi & Secubit Garam 

Bahan-bahan:
2 3/4 cawan tepung gandum (315g)
2 1/2 sudu kecil baking powder
1/2 sudu kecil garam
2/3 cawan mentega, suhu bilik (150g)
1 lb. gula perang (453g) *saya guna 220g
3 biji telur gred A
1 sudu kecil esen vanilla
11.5 oz coklat chips (326g) *saya guna dark chocolate dicincang kasar
1 cawan kacang pecans, dicincang (optional) *x letak

Cara-cara:
1. Ayak tepung gandum, baking powder dan garam dalam satu bekas. Ketepikan.
2. Dalam bekas yang lain, pukul mentega dengan gula perang. 
3. Masukkan telur sebiji demi sebiji dan dan pukul hingga adunan sebati.
4. Tambah esen vanilla, coklat chips/dark chocolate dan kacang pecan (jika guna).
5. Masukkan campuran tepung yang telah diayak tadi dan kacau lagi.
6. Gris loyang segi empat (13 X 9 inci) dengan mentega atau non-stick spray dan tuangkan adunan. Ratakan permukaan adunan dengan senduk kayu. *saya guna loyang 10X10 inci dan alas dengan baking paper
7. Bakar pada suhu 170C selaam 30 minit atau hingga masak. *saya bakar suhu 160C selama 30 minit.

Friday, 22 March 2013

Sweet Orange Rolls

Remember my previous post on Blended Orange Condensed Milk Pound Cake? Since I blended two oranges then, I still had some orange puree left. So I decided to make these sweet orange rolls. I found a recipe on Sally's Baking Addiction and immediately know I would follow her recipe because the previous recipe of hers which I tried, the Nutella Swirled Peanut Butter Banana Bread turned out fabulous, just the right amount of sweetness for me. I must say that the rolls could definitely do with the glaze as the bread itself is not overly sweet. I did not do the glaze as the household is not much of a fan of all things sweet...and they are not quite cinnamon fans too...I know...so I omit that too. Anyway, I bake this in a rectangle casserole dish inspired by Lauren's Latest. Oh, if you decide to add the orange puree, don't be alarmed if your dough did not rise as high as before. I experienced this too and I think that is because the orange puree added weight to the dough. The dough still rises though it may look quite flattened. Mine turned out soft and tender in the end, just how sweet rolls should be.
Sweet Orange Rolls
Source: Sally's Baking Addiction

Ingredients:
Dough
1 package active dry yeast (2 and 1/4 teaspoons)
1/2 cup warm water *I used milk
fresh orange zest from 1 medium sized orange
1/2 cup orange juice
1/4 cup sugar
1 teaspoon salt
1 large egg
2 Tablespoons unsalted butter, softened to room temperature
3 - 3 1/2 cups all-purpose flour 

1 tablespoon orange puree *I added (for steps to make the puree, refer here)
Filling
2 Tablespoons sugar *I used 3 tablespoons light brown sugar
2 teaspoons ground cinnamon *I omit
1 Tablespoon unsalted butter, softened to room temperature *I used 2 tbsp

1 tablespoon orange puree *I added
1 tablespoon Sunquick orange fruit drink base *I added (optional)  
Glaze *I didn't do
1 cup confectioners' (powdered) sugar
1 Tablespoon orange juice
fresh orange zest from 1 medium oranges
1 teaspoon vanilla extract


Method:
  1. Make The Dough: Dissolve the yeast in 1/2 cup warm water (or milk) for about 1 minute. No need to use a thermometer for the water's temperature, but to be precise: about 105-115F degrees. Stir the yeast/water around. Then add orange zest, orange juice, sugar, salt, egg, butter, and 1 1/2 cups of flour. Beat everything together on low with a handheld mixer, scraping down the sides as needed. (A mixer is definitely needed to break up all the butter and beat everything to the proper consistency - I just used wooden spoon). With a wooden spoon, stir in enough of the remaining flour to make a dough easy to handle - about 1 1/2 - 2 more cups*. You are looking for a dough that is not sticky and will spring back when poked with a finger. 
  2. Transfer the dough to a lightly floured surface and knead it with your hands for about 5-6 minutes. Form the dough into a ball and transfer it to a lightly greased bowl. Cover the dough and let sit in a warm place until doubled in size, about 1.5 hours (I left it for 1 hour).
  3. Line the bottom of a 9x13 inch baking dish with parchment paper,leaving room on the sides. Turn the dough out onto a lightly floured work surface and, using a rolling in, roll into a 15x9 inch rectangle. I used a ruler for accuracy (a lazy me didn't). Make sure the dough is smooth and evenly thick, even at the corners.
  4. For The Filling: in a small bowl, mix together sugar and cinnamon. Spread the dough rectangle with softened butter (I mixed the softened butter with orange puree and orange fruit drink base) and sprinkle generously with all of the cinnamon-sugar mixture. Tightly roll up the dough and cut into 16 even rolls (1 inch in width each) (mine were 12 jumbo ones) with a very sharp knife. Arrange them in the prepared baking pan, cut sides up. Cover the rolls and let them rise in a warm place for about 30 minutes - 1 hour. 
 
  1. Preheat the oven to 375F degrees (I preheated at 180C). Cover the rolls with aluminum foil (I forgot!) and bake for about 25-30 minutes (I baked them for 15 mins and brush the rolls with some melted butter after taking them out), until they are lightly golden in color. Transfer the pan to a rack to cool for about 15 minutes. 
  2. Make The Glaze: In a small bowl, mix together all of the glaze ingredients and drizzle over rolls before serving. 

    Notes
    * I added 2 cups of flour and my dough is still sticky. Not wanting to add more flour for fear the bread will turn out hard, I transferred the dough to a highly floured surface and knead until it is no longer sticky.  

    Make Ahead: The recipe can be prepared through Step 4.  Cover the rolls and let sit at room temperature overnight before beginning step 5.   Baked rolls can be frozen up to 1 month and warmed up to enjoy at a later date.  Glaze right before serving.
    Sweet Orange Rolls
    Sumber: Sally's Baking Addiction

    Bahan-bahan:
    Doh
    2 1/4 sudu kecil yis *saya guna Mauripan
    1/2 cawan air suam *saya guna susu
    parutan kulit oren daripada sebiji oren
    1/2 cawan jus oren
    1/4 cawan gula
    1 sudu kecil garam
    1 biji telur
    2 sudu besar mentega lembut/ marjerin
    3 - 3 1/2 cawan tepung gandum

    1 sudu besar puri oren *saya tambah (langkah-langkah untuk menyediakan puri oren boleh rujuk sini)
    Inti
    2 sudu besar gula *saya guna 3 sudu besar gula perang
    2 sudu kecil serbuk kulit kayu manis *x letak
    1 sudu besar mentega lembut/marjerin *saya guna 2 sudu besar marjerin

    1 sudu besar puri oren *saya tambah
    1 sudu besar oren Sunquick *saya tambah (optional)  
    Glaze
    1 cawan gula aising
    1 sudu besar jus oren
    parutan kulit oren daripa sebiji oren
    1 sudu kecil esen vanilla


    Cara-cara:
    1. Untuk Doh: Satukan yis dan air/susu suam dalam satu bekas besar dan biar selama seminit. Selepas itu, kacau campuran yis tadi dan tambah parutan kulit oren, jus oren, gula, garam, mentega/marjerin dan 1 1/2 cawan tepung gandum. Pukul semua bahan dengan mixer (saya guna senduk kayu). Kemudian tambah lagi 1 1/2 cawan - 2 cawan tepung* (saya tambah 2 cawan) dan kacau sehingga doh tidak melekit. 
    2. Ubah doh di atas permukaan yang ditabur dengan tepung dan uli selama 5-6 minit sehingga doh licin. Letak doh dalam bekas yang digris dengan sedikit marjerin dan biar selama sejam (sampai doh naik 2 kali ganda).
    3. Alas loyang 9x13 inci dengan baking paper (saya guna casserole dish). Ambil doh tadi dan canai kepada bentuk segi empat 15x9 inci.
    4. Untuk Inti: Campurkan serbuk kulit kayu manis dan gula dalam mangkuk. Sapu doh yang dicanai tadi dengan marjerin (saya campur marjerin dengan oren Sunquick dan puri oren) dan tabur campuran gula tadi. Gulung doh tadi dan potong kepada 16 bahagian (saya potong 12 bahagian). Susun roll di atas loyang tadi dan biar naik lagi selama 30 minit-1 jam.
     
    1. Panaskan oven pada 180C. Tutup rolls tadi dengan aluminum foil (x buat) dan bakar selama 25-30 minit (saya bakar 15 minit). Sejukkan.
    2. Untuk glaze: Satukan semua bahan dalam mangkuk dan drizzle atas rolls. 
    Nota
    * Doh saya masih melekit selepas semua tepung ditambah. Saya uli doh di atas permukaan yang ditabur dengan banyak tepung dan uli sehingga licin.

    Monday, 18 March 2013

    Carrot Muffins/ Muffin Lobak Merah

    This is one of the recipes I've bookmarked quite some time ago from Patrcia Scarpin's blog Technicolor Kitchen. First of all the recipe is from the fabulous Donna Hay; and second of all, it calls for a cup of yogurt. I am all for recipes with yogurt or buttermilk because they are healthy and the end result would definitely be decadently moist. I knew from the start that these muffins would be so moist - and they were indeed. Take note that the muffins are on the less sweet side, so I added some raisins for extra natural sweetness. You could add some apples too if you like, or maybe increase the sugar...but that would not be a healthier option right?
       
    Carrot Muffins
    Source: Technicolor Kitchen

    Ingredients:
    2 cups (280g) all purpose flour
    2 teaspoons baking powder
    ¾ cup + 1 tablespoon (162g) caster sugar *I used 100g caster sugar and 70g light brown sugar
    pinch of salt
    1 cup (260g) plain yogurt
    2 eggs
    ½ cup (120ml) vegetable oil
    finely grated zest of 1 large lemon
    1 ½ cups (135g) grated carrot

    1/4 cup raisins *I added
    icing sugar, to serve


    Method:
    1. Preheat the oven to 180°C/350°F; line twelve ½-cup (120ml) capacity muffin pans with paper cases.
    2. Sift flour and baking powder into a large bowl. Add the sugar and salt and stir to combine. Set aside.
    3. Place the yogurt, eggs, oil and lemon zest in a bowl and whisk until smooth. Add the yogurt mixture, grated carrot and raisins to the flour mixture and whisk just until combined – use a fork to mix and do not overmix; the batter is supposed to be lumpy.
    4. Spoon the batter into the prepared cases and bake for 20-25 minutes or until golden and cooked when tested with a skewer. *I baked for 20 mins
    5. Sprinkle with icing sugar to serve.


    Makes 12
    Muffin Lobak Merah
    Sumber: Technicolor Kitchen

    Bahan-bahan:
    2 cawan (280g) tepung gandum
    2 sudu kecil baking powder
    ¾ cawan + 1 sudu besar (162g) gula kaster *saya guna 100g gula kaster dan 70g gula perang
    secubit garam
    1 cawan (260g) yogurt
    2 biji telur
    ½ cawan (120ml) minyak sayuran
    parutan kulit sebiji lemon
    1 ½ cawan (135g) parutan lobak merah

    1/4 cawan kismis *saya tambah
    gula aising, untuk tabur atas muffin


    Cara-cara:
    1. Panaskan oven pada suhu 180°C/350°F; Alas loyang muffin dengan kertas cupcake.
    2. Ayak bersama tepung gandum dan baking powder ke dalam satu mangkuk besar. Masukkan gula dan garam. Kacau rata dengan whisk. Ketepikan.
    3. Dalam bekas yang lain, satukan yogurt, telur, minyak sayuran dan parutan kulit lemon dan kacau sebati dengan whisk. Tuang adunan yogurt tadi, parutan lobak merah dan kismis ke dalam campuran tepung. Gaul rata dengan whisk; jangan terlebih kacau.
    4. Tuang adunan ke dalam loyang muffin tadi dan bakar selama 20-25 minit  atau sehingga masak. *saya bakar 20 minit
    5. Tabur dengan gula aising jika suka. 

    Friday, 15 March 2013

    Blended Orange Condensed Milk Pound Cake/ Kek Oren Susu Pekat Manis

    I know, I know, another one. Yes, I am crazy about condensed milk pound cake. The last time I put an orange twist to it was when I baked them as cupcakes and marbled one with cocoa batter, here. This time, no marbling is involved, just the decadently dense and moist pound cake bursting with citrus goodness. Every slice you eat is like eating a slice of orange, but in cake form. I pureed two oranges this time so I can use them for other recipes and I am already thinking of orange buns and orange sugar cookies. Just a little of this puree goes a long way in terms of flavour and colour too. I like how simple it is to make this orange puree. I've come across recipes that require the orange to be boiled for like 2 hours while in another recipe, the water used to boil the orange needs to be replaced like 3 times. Although this recipe only calls for the orange to be boiled for an hour, I have to say it works to alleviate any bitterness in the fruit. Adding the puree will make the cake denser and it will require a longer baking time. I baked it at a low temperature (165C) for about 1 hour and 10 minutes.    

    Orange Condensed Milk Pound Cake
    Adapted from: 
    baking fiends unite! 
    Bisous a Toi

    Ingredients:
    240gm good quality butter
    90gm sugar
    1/4 tsp salt
    1 cup (304gm) condensed milk
    3 tsp vanilla paste *I used 2 tsp vanilla and 1 tsp lemon extract
    240gm cake flour *I used all purpose flour
    1 1/2 tsp baking powder
    4 large eggs
    1 orange - I used Valencia orange that weighs about 100g

    Method:
    Make the orange puree:
    1. Pierce the orange with a skewer in some spots. 
    2. Put it in a deep pan and cover with water. Bring to the boil, lower the heat, cover and simmer for 1 hour, until soft. Drain, then cool (alternatively, you could put the orange in a crock pot/slow cooker on low heat overnight until soft)
    3. Cut the orange in half and discard the pips. 
    4. Put the orange, skin and all, in a blender or food processor and puree until smooth and pulpy. Set aside. 
    Remove the pips after boiling the orange...
    ...then puree (skin and all) until smooth.
    Make the cake: 
    1. Sift cake flour and baking powder together. Set aside.
    2. Cream butter and sugar till light and fluffy.
    3. Add in salt and vanilla paste and cream well.
    4. Pour in condensed milk and orange puree and cream till well combined.
    5. Using the mixer on low speed, add in flour in 3 additions. Mix till batter is smooth.
    6. Add in eggs one at a time. Make sure it's well mixed and smooth.
    7. Pour batter in a greased pan and bake at 165C for 1 hour to 1 hour and 10 minutes or until a skewer inserted at the centre of the cake comes out clean. 
    Kek Mentega Oren Susu Pekat Manis
    Diolah daripada: 
    baking fiends unite! 
    Bisous a Toi
    Dapur Tanpa Sempadan 

    Bahan-bahan:
    240 gram mentega berkualiti tinggi 
    90 gram gula halus
    Secubit garam
    1 cawan susu pekat manis
    2 sudu kecil esen vanilla
    240 gram tepung kek *saya guna tepung gandum
    1 1/2 sudu kecil baking powder
    4 biji telur gred A
    1 biji oren *saya guna buah oren Valencia (kurang lebih 100g)

    Cara-cara:
    Untuk puri oren:
    1. Cucuk buah oren beberapa kali dengan lidi. 
    2. Rebus buah oren di dalam periuk dengan air penuh sehingga mendidih. Kemudian, perlahankan api, tutup periuk dan rebus lagi selama 1 jam sehingga buah lembut. Tos dan sejukkan.
    3. Potong dua buah oren tadi dan buang bijinya. 
    4. Kemudian, kisar buah oren (dengan kulit sekali) di dalam pengisar atau food processor sehingga hancur.

    Untuk kek: 
    1. Panaskan oven pada suhu 165C, griskan tin kek bersaiz 9 inci dengan mentega dan alas dasarnya dengan kertas minyak, lenser juga kertas tadi. Ayak tepung dan baking powder. Ketepikan. 
    2. Putar mentega dengan gula hingga putih.
    3. Masukkan esen vanilla dan garam, putar hingga gebu.
    4. 
    Tuang susu pekat manis dan puri oren; putar lagi hingga sebati.
    5. Perlahankan kelajuan dan masukkan tepung yang telah diayak tadi sedikit demi sedikit hingga habis, putar rata.
    6. Akhir sekali masukkan telur satu persatu sambil terus memutar hingga mendapat adunan yang licin.
    7. Tuang adunan dalam loyang tadi dan bakar selama 1 jam-1 jam 10 minit atau sehingga masak sempurna.

    Blueberry Cheese Tart

    A recipe I got from my cousin. Irresistable and super simple to make. You can make the tart shells ahead of time and store them in an airtight container in the fridge. The filling can be substituted with other fruits and flavours like strawberry for example. I bought a ready-made filling from the bakery. You can for sure make your own filling though. The best part for me is painting the pattern on the filling. I would love to try other patterns though next time.
    Blueberry Cheese Tart 
    The pastry recipe below could easily yields 12 medium-sized tart shells (and you still have leftover dough) while the cream cheese filling is perfect to fill 12 tart shells. Feel free to increase or decrease the amount as you like.  

    Ingredients: 
    Tart shell:
    125g cold butter, diced
    225g all-purpose flour
    50g caster sugar
    1 large egg yolk

    1 teaspoon vanilla extract
    1-2 tablespoons ice cold water 

    Cream cheese filling:
    125g cream cheese, softened
    25g butter, soften
    30g caster sugar
    1/2 egg (beat an egg then weigh, about 30g)
    1 teaspoon vanilla or lemon extract

    blueberry filling 

    Method: 
    Pastry Shell:
    1. Put the cold butter pieces, flour and sugar in a large bowl. Work those ingredients with your fingers until they resemble coarse bread crumbs. Don't worry if there are still some visible butter pieces. They will puff up in the oven and result in a flaky crust.

    2. Add the vanilla extract, egg yolk and a tablespoon of ice cold water (1 tbsp works for me; you might add more if your egg yolk is smaller). Work the mixture together to form a dough. Do not overwork the dough. Once the dough has come together, flatten and wrap with cling film. Chill the dough for at least 30 minutes in the refrigerator.

    3. Preheat the oven at 170C. Take out the dough from the fridge and roll it on a floured surface or between two sheets of clean plastic. Then, cut into discs to line individual tart moulds. Prick the bottom with a fork. Bake the shells in the preheated oven for 20 minutes until golden brown. Set aside to cool a bit and remove from mould.

    Cream cheese filling:
    1. Beat all the ingredients until smooth and creamy.  

    For blueberry cheese tart:
    1. Preheat the oven at 170C. Take a cooled tart shell and fill with blueberry filling (about a tablepoon). Then top with the cream cheese filling:
    2. You can do a pattern on top of the tart if you like. I learned to do this pattern from the superbly creative and talented Kak Ita of masam manis. Please check out her blog for fantastic decorating ideas. Also check out HaSue's blog for cheese tart decoration ideas. For the pattern: dip the tip of a toothpick in the blueberry filling or food colouring. Make small lines down the side of cream cheese filling and run the toothpick gently across the lines, like this:
    3. Bake the cheese tart in the preheated oven for 5-8 minutes until the cream cheese filling is just set. You can test whether the filling has set by gently tapping your fingertip on the surface; if it doesn't stick, then it has set. Don't overbake or else the filling will become hard. Best serve chilled.
    Blueberry Cheese Tart 
    Resepi kulit tart ni boleh dapat lebih dari dua belas biji (saya buat 12 je, doh yang lebih simpan dalam freezer). Cream cheese filling cukup2 untuk 12 tart. Kalau nk buat lebih, boleh gandakan resepi di bawah.

    Bahan-bahan: 
    Kulit tart:
    125g mentega sejuk didadu
    225g tepung gandum
    50g gula kaster
    1 kuning telur* (saya guna gred A)

    1 sudu kecil esen vanilla
    1-2sudu besar air sejuk dari peti ais

    Cream cheese filling:
    125g cream cheese, biar lembut sedikit
    25g mentega (suhu bilik)
    30g gula kaster
    1/2 biji telur (pukul telur dan timbang, kurang lebih 30g)
    1 sudu kecil esen vanilla atau lemon

    inti blueberry filling secukupnya

    *Jika gandakan adunan untuk kulit tart, boleh guna 1 biji telur gred B untuk 250g butter.

    Cara-cara: 
    Kulit tart:
    1.Satukan mentega sejuk, tepung dan gula di dalam satu bekas. Ramas dengan menggunakan jari sehingga adunan menjadi seperti serbuk roti.

    2. Tambah esen vanilla, telur kuning dan satu sudu besar air sejuk. Gaul sebati menggunakan tangan hingga menjadi doh. Tekan sedikit doh, balut dengan cling wrapper dan rehatkan di dalam peti sejuk.

    3. Panaskan oven pada suhu 170C. Keluarkan doh daripada peti sejuk. Ambil sedikit doh dan tekan ke dalam acuan tart. Cucuk dengan garpu dan bakar selama 20 minit atau sehingga masak. Sejukkan sedikit dan keluarkan daripada acuan tart. 
    Cream cheese filling:
    1. Pukul semua bahan sehingga berkrim.  

    Untuk blueberry cheese tart:
    1. Panaskan oven pada suhu 170C. Ambil kulit tart tadi dan isi (boleh juga paip) dengan inti blueberry (anggaran 1 sudu besar). Selepas itu, isikan dengan cream cheese filling (isi penuh):
    2. Kemudian, bolelah hias tart tadi. Saya guna corak yang diajar Kak Ita masam manis. Untuk idea lain, boleh singgah ke dapur HaSue. Untuk corak tersebut, celupkan hujung pencungkil gigi ke dalam pewarna atau inti blueberry dan buat garis-garis kecil di bahagian tepi tart. Kemudian dengan menggunakan bahagian yang tajam, tarik daripada atas ke bawah  dalam bentuk bulatan untuk mendapatkan bentuk seperti berikut:
    3. Bakar cheese tart dalam oven yang telah dipanaskan tadi selama 5-8 minit sehingga masak. Untuk menguji sama ada cheese telah set atau tidak, sentuh dengan hujung jari. Jika tidak melekat, maknanya telah masak. Jangan terlebih bakar kerana filling akan menjadi keras.

    Thursday, 14 March 2013

    Potato Buns/ Roti Kentang

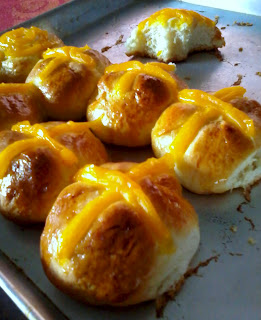
    My mum, sis and I went shopping at Tesco the other day and at that time, there were plenty of reduce to clear (RTC) items of fruits and vegetables on sale. Some goods were surprisingly still in good condition. We bought quite a lot of those RTCM stuffs (many were mushrooms of all sorts) and there were two packs of potatoes among those items. I used one pack for shepherd's pie and there left another pack. I decided to make these buns instead. I tweaked the recipe that I found on both Mat Gebu's Dapur Tanpa Sempadan and Kak Ros' Bukan Sekadar Masakan. Both recipes are suitable for those who have a bread machine. As I knead by hand, I reduced the amount of liquid used. If you use a bread machine to knead your dough, then you might follow either the original recipes.    
    Potato Buns
    Adapted from: dapur tanpa sempadan & bukan sekadar masakan

    Ingredients: 
    To activate yeast:
    2 teaspoons instant dried yeast
    50g sugar 
    100ml lukewarm milk 

    Water roux:
    10g flour
    50g water
    ~~~~~~~~

    350g all purpose or bread flour
    3/4 teaspoon salt
    90g mashed potato (boil, mash then weigh; about 1 medium sized potato)
    1/2 egg (beat then weigh, about 30g. the rest will be used for glazing)

    1 tablespoon butter, melted and cooled
     

    Custard (to top the bun; optional):
    2 tablespoons instant custard powder
    3/4 cup fresh milk
    3 tablespoons sugar

    1 teaspoon butter
    1/2 teaspoon vanilla extract

    Method: 
    For custard topping: Combine all ingredients in a saucepan and stir on medium heat until mixture thicken. Add more milk if the custard is too thick. Set aside to cool.

    To activate yeast: In a small bowl, combine the yeast, sugar and warm water/milk. Set aside.

    For water roux: Mix the flour and water in a saucepan and stir on medium heat until thicken. Set aside to cool.  

    For the bread:
    1. If using bread maker, put all ingredients in the machine and select 'dough' menu. If using hand (like me), put the
    flour and salt in large bowl. Add in the mashed potato, beaten egg, melted butter, water roux and activated yeast mixture. Knead until an elastic, non-sticky dough is formed.
    2. Set the dough to proof for about an hour until it doubles in size.
    6. After that, punch the the dough to release the air out. Then, shape the dough into buns of any sizes you fancy and put them on a greased pan. Rest the shaped dough for at least 30 minutes to an hour to allow them to rise again.  
    3. Preheat the oven to 350F or 180C. Put the custard in a piping bag (or a clean plastic bag) and pipe on top of bun in whatever shapes (I did cross and spiral). Glaze the dough with the remaining half a beaten egg and bake in the preheated oven for 12-15 minutes (depending on the size of your bread) or until cooked. 
    8. Lightly brush the tops of bread with the margarine or melted butter when done to prevent crust from getting hard. 

    Before and after...
    Bun Kentang
    Diolah daripada: dapur tanpa sempadan & bukan sekadar masakan

    Bahan-bahan: 
    Untuk aktifkan yis:
    2 sudu kecil yis *saya guna Mauripan
    50g gula
    100ml susu/air suam 

    Water roux:
    10g tepung gandum
    50g air
    ~~~~~~~~

    350g tepung gandum atau tepung roti
    3/4 sudu kecil garam
    90g kentang lecek (rebus,lenyek dan timbang)
    1/2 biji telur (kocok telur dan timbang, kurang lebih 30g. telur selebihnya akan digunakan untuk glis roti sebelum bakar)

    1 sudu besar mentega/marjerin cair
     

    Untuk topping kastard:
    2 camca besar tepung kastard
    3/4 cawan susu segar
    3 camca besar gula halus
    1 camca teh mentega
    1/2 camca teh esen vanilla


    Cara-cara: 
    Untuk topping kastard: Satukan susu, gula dan tepung kastard. Kacau dengan wisk hingga semua sebati. Masak atas api perlahan sambil terus mengacau hingga pekat. Angkat dari api, masukkan mentega dan esen vanilla. Gaul rata dan biarkan suam sedikit.

    Untuk aktifkan yis: Dalam bekas kecil, satukan yis, gula dan susu/air suam. Ketepikan.

    Untuk water roux: Kacau tepung dan air di atas api sederhana hingga memekat. Sejukkan.  

    Untuk roti: 
    1. Jika Menggunakan bread maker (BM) masukkan semua bahan  dan pilih menu Dough dan tekan ON, setelah siap boleh terus dibentuk bebola kecil. Kalau uli dengan tangan: Satukan tepung dan garam dalam satu bekas besar. Kemudian, masukkan kentang lecek, telur, mentega cair, water roux dan campuran yis tadi; kacau sebati. Selepas itu,uli sehingga doh menjadi elastik dan licin.
    2. Kemudian perap doh dan tutup bekas adunan dengan plastic wrap dan biar doh naik dua kali ganda (lebih kurang 45 minit). Selepas itu tumbuk-tumbukkan doh bagi mengeluarkan angin. Bahagi doh pada 16 bahagian kecil (saya bahagi kepada 20) dan susun di dalam loyang petak atau dulang pembakar (pastikan loyang atau dulang pembakar di sapu dahulu dengan sedikit marjerin, bagi memudahkan bun keluar apabila siap dibakar nanti). 
    3. Biarkan naik dua kali ganda (30-45 minit). Akhir sekali glis permukaan bun dengan baki telur yang ditambah dengan 1 sudu kecil susu segar dan paipkan sos kastard di atas permukaan bun . Bakar pada suhu 180 darjah selama  15 minit. Setelah siap di bakar, sapu permukaan roti dengan sedikit mentega dan sejukkan atas redai. Sedia untuk dihidangkan.